Expense Report
The Expense Report section under Reports in the PerksPe Web admin dashboard allows administrators and HR personnel to view, filter, audit, and export all business expenses submitted by employees. This centralized dashboard streamlines tracking reimbursement statuses, checking vendor names, matching approvals, and generating custom downloads for accounting.
1. Locating the Expense Report
To access the Expense Report:
- Navigate to the sidebar on the left side of the dashboard.
- Click on the Reports dropdown menu to expand it.
- Select Expenses from the list.
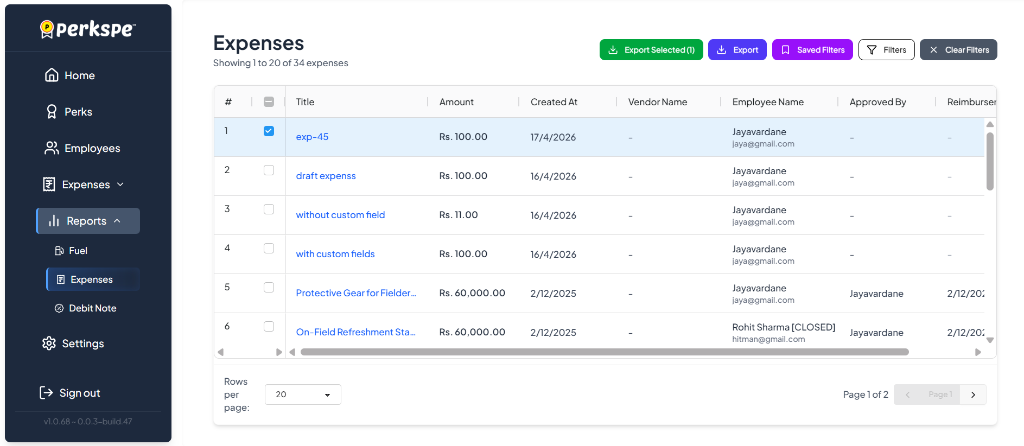
2. Expense Report Interface
The Expense Report interface displays a comprehensive table listing all employee expenses. Here, you can review details like the expense title, amount, creation date, vendor name, employee name, approver, and reimbursement details.
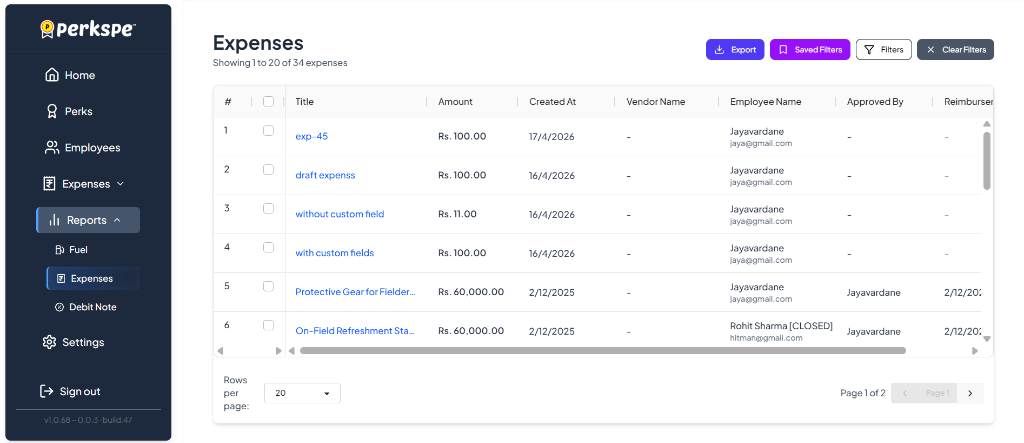
Column Breakdown
| Column | Description |
|---|---|
| # | The row index for each expense record. |
| Checkbox | Select individual or multiple expenses to perform bulk actions (e.g., exporting selected records). |
| Title | The descriptive name of the expense submission (e.g., exp - 45, with custom fields). Click on the title to view full details. |
| Amount | The monetary value of the expense (e.g., Rs. 100.00). |
| Created At | The date on which the expense was originally submitted. |
| Vendor Name | The merchant or vendor associated with the transaction (displays a dash - if not specified). |
| Employee Name | The name and email address of the employee who submitted the expense. |
| Approved By | The name of the manager or administrator who approved the expense submission. |
| Reimburser | Details of the reimbursement, including the name of the reimburser and the date the reimbursement was processed. |
3. Actions & Filters
You can manage and filter the report using the control buttons located in the top-right corner of the table:
- Export: Click the blue Export button to download a complete export of all expenses currently in the system.
- Saved Filters: Click the purple Saved Filters button to quickly load a saved set of filtering criteria.
- Filters: Click the Filters button to open the filter menu, allowing you to narrow down the table list by employee, date range, amount, or custom fields.
- Clear Filters: Click the Clear Filters button to reset all active filters and display the full expense table.
4. Exporting Selected Records
If you only need to download specific expense records, you can perform a bulk export:
- Select the checkboxes next to the specific expense rows you want to export.
- Once at least one row is checked, a green Export Selected (N) button will dynamically appear at the top-right of the table (where N is the count of selected records).
- Click Export Selected (N) to download a spreadsheet containing only the checked records.